Cardboard bird. DIY bird - how and from what to make a beautiful decoration in the shape of a bird (110 photo ideas)
Today we will make funny birds - flamingos, storks, crows, parrots and yellow chicks. One of the current topics for creativity in kindergarten or holding a homework competition is bird crafts.
Before you start creating this craft, you can first conduct a thematic lesson with your children, talk about the life of birds in the summer, and why it is at this time that we most often hear bird voices around us.
If the goal is an interesting DIY bird craft for a kindergarten or early development center for a competition, then you need to use the most beautiful and original materials to create it.
Undoubtedly, real feathers will decorate such a craft. From them you can lay out a whole image of a bird, based on the color of the feather. For example, white feathers can turn into a charming stork. To create the beak and legs, use three-dimensional materials, and for greater naturalism, place the bird in a nest made of real straw or dry grass.

A very original postcard with a stork will be made using voluminous paper elements.

You can use feathers to decorate the finished image - create a crest, wings or a tail from them. Here, for example, is what kind of parrot can be made from feathers and ice cream sticks.

You can make a bird out of paper, but place it in a large basket made from two disposable plates.

A wonderful chicken can be made from folded paper or a cardboard roll.

Eggshells dyed with food coloring make adorable chicks. If we plant them in halves of unpainted shells, we will get a touching “hatched chickens” composition!

And here is a lovely couple - a cockerel and an eggshell hen.

Another option for making hens and chickens is from felt.

This craft would make a wonderful Easter basket.

Easter basket "chicken"
You can make a wonderful souvenir in the form of a chicken with a flower from felt and satin ribbons.

Another adorable chick in a shell can be made using the quilling technique.

Watch the video “how to make a bird in a cage:”
You can add some zest to the applique by extending the bird’s paws and head beyond the cardboard base.

If you have multi-colored wings, you can make a fantastic flamingo. Its body will be an old CD, its paws will be made of chenille wire, and its head and neck will be made of felt or velvet cardboard.

You can do without feathers.
A beautiful three-dimensional stork will be made from cotton wool and thick knitting yarn.

Or from round, folded in half, white and black paper blanks. An application made from such modules looks very strict and impressive.

Instead of paper, it is convenient to use disposable plates to create semicircular modules. One plate becomes the body of one bird.

And this is a funny applique “flying birds with a feather”.

Very impressive bright birds are made from plain paper. Thin sticks are glued to two opposite sides of the paper circle. The circle is folded in half - the sticks are connected together to form the legs of the bird. They can be fixed with plasticine - then the bird will stand. The beak, wings, tail and comb are made from bright colored strips of paper.

A variety of birds can be made from natural materials. For example, a cockerel made from apples can become a real table decoration.

A smart penguin with glasses can be made from eggplant and carrots.

The penguin can be made using the appliqué technique from paper and cotton wool.

Penguin applique made of paper and cotton wool
A stunning penguin figurine can be made from painted walnut shells.

A funny turkey can be made from maple leaves.

And wings made from a variety of prints of different colors will be useful for a chic, bright parrot.

You can do the opposite - draw the body of a bird, and make the wings from a different material. For example, a disposable plate.

A spectacular lark is made from cardboard and paper folded like an accordion.

Using the same technique you can make a variety of colored birds. Look at the video on how to do this:
A paper lark can also be made using the popular origami technique:
You can decorate the finished applique with touches of paint, which will look much more interesting if you use wood glued together from wood-colored decorative film and colored paper as the main background.

The application “birds in a nest” can turn out to be very touching and spring-like. An application in which a combination of materials will be used in the nest looks interesting. For example, to make this application we used paper, napkins and plasticine.

Application “birds build a nest”
Using various creative materials, you can make a three-dimensional applique with birds and insects.

See how to make a beautiful spring applique with birds and birch trees:
Very interesting birds can be made using the trimming technique. The base of the craft is smeared plasticine. Using a small stick or toothpick, insert pieces of paper into it. We made a graceful swan using the cutting technique.

But such a charming swan can be made from a pine cone, a CD and plasticine.

The pine cones can be used to make extremely charming owls.

Another amazing way to make a swan is to glue it together from beautiful white shells.

A very beautiful bird is made from smooth pebbles.

Perhaps the most original idea for making birds is to make them in the form of soap.


Another wonderful bird is made from nuts.

A wonderful fluffy winter bullfinch can be made from thread.

Look at the video “how to make a beautiful bird from threads”:
A painted bullfinch will be a wonderful decoration for a winter picture or postcard.

Drawing "Bullfinch"
The smallest artists can draw birds using their palms and fingers.

Drawing with palms and fingers “birds”
Spring birds on a branch, gouache drawing:

This is how different do-it-yourself bird crafts can be, photos of which you could now see.
DIY bird craft reviews:
“How many different options) do it, you can’t change it”) (Ksyu)
I really liked the bullfinch made of threads) (Sasha)
Master class “The birds have arrived”
Craft for 1st grade students.
Appointment of the master class: making a paper model of a white stork for Bird Day.
Goals: develop cognitive interest in the nature of the native land through making a model of a bird; develop basic environmental and ethical standards of behavior in nature.
Tasks:
Development of fine motor skills of the hands;
Formation of motivation for creative work, skills in working with paper, work for results; the formation of a holistic, socially oriented view of the world in its organic unity and diversity of nature, respect for other opinions;
Formation of aesthetic taste in the design of work.
Equipment: sheets of white paper, scissors, markers, table “Do you know birds?”
Progress of the lesson
1. Teacher's story.
Spring. Nature awakens from winter hibernation. One of
The first reminders of the onset of spring are birds that return from warm countries. The bustle of birds and their chirping welcomes the revival of nature.
The white stork is a bird of sun, peace and goodness. Every year he returns to his old place at the end of March or early April. People are accustomed to viewing her as a guardian angel of the hearth, as a peaceful symbol of constancy and well-being.
Storks are listed in the Red Book. They need to be protected. In June 2012, an action was carried out in the Novooskolsky district - a census of white storks. In our settlement, these birds live in the village of Tavolozhanka.
2. Announcing the topic of the lesson.
I want to invite you to make such a guardian angel.
3. Work plan.
1) Cut out a square from a sheet of white A4 paper.
2) Draw the blank.
.jpg)
3) Color the tail and wings with a black marker.
.jpg)
4) Roll diagonally.
.jpg)
5) Cut out the head and neck, cut the feathers.
.jpg)
6) Twist the cut feathers on the tail and neck.
.jpg)
7) Turn it inside out, inserting the tail into the cut.
.jpg)
.jpg)
4. Children doing the work.
5. Dynamic pause:
We gently wave our arms to the sides -
These are the birds flying towards us.
How they sit quietly
Let's show - the wings are folded back.
They bent over and sat down.
They sat down to study quietly.
6. Summing up.
.jpg)
Why are birds needed?
Why do they need to be protected?
When is Bird Day celebrated?
Summary: Paper bird crafts. DIY bird craft. How to make a paper bird. Spring crafts for children. Children's spring crafts from natural materials.
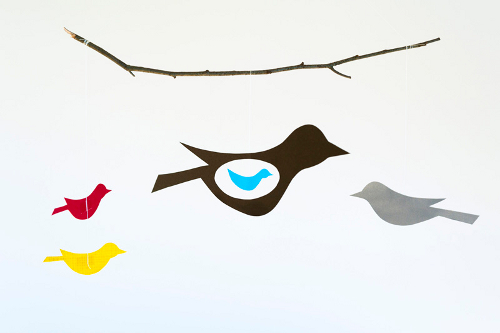
Spring's most faithful friends are birds. In spring, nature awakens from hibernation, the trees are filled with life-giving sap - life is everywhere! And the birds are the first to remind us of this. The hubbub of birds greets the revival of nature with victorious force. For this reason, we could not help but include in our section “Do-it-yourself spring crafts with children” a selection article “Crafts of birds from paper and fabric”. We will teach you how to make paper birds. Using our ready-made templates and detailed instructions, you can make an original spring craft - the “Spring Birds” mobile, which will decorate the interior of your home. You will also learn how to sew beautiful birds from fabric.
1. Bird crafts. Paper birds
A very simple spring craft for kids. To make these cute paper birds you will need scrapbooking paper, colored paper clips, glue and a hole punch.
Download the bird template from the link >>>> Print and cut out. To make one bird you will need two mirror pieces. Before gluing them together, take two paper clips and straighten them to create “bird legs”. Place them between the two sides of the bird and glue the sides together. Make the eye using a hole punch. Children's spring craft is ready!
2. Crafts bird. How to make a bird out of paper
We present to you another simple spring paper craft. You can make it in literally 10 minutes.


And one more spring craft - a mobile from the well-known blog madebyjoel.com. On this site you will also find video instructions. The template can be printed using the link.
4. Children's crafts spring. DIY bird crafts
If you don't know how to make a paper bird, be sure to visit the Bulgarian website Krokotak.com. There you will find two great spring crafts for children: a white stork and a swallow.
White stork made of paper. How to make a paper stork

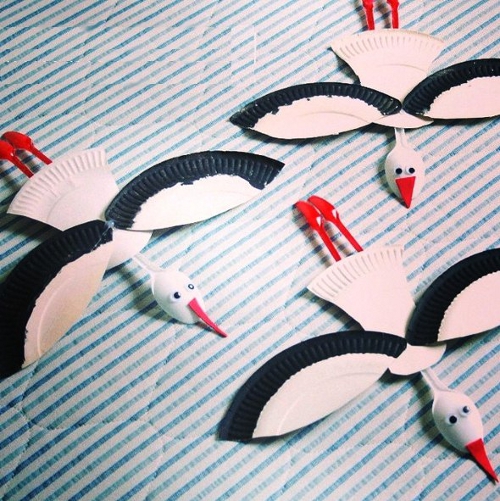
The white stork is an extremely positive symbol among most peoples of Europe, Asia, America and Australia, an emblem of the sun, peace and goodness. The stork, arriving from warm regions at the end of March or at the beginning of April, is quite naturally associated with spring and the beginning of a new life. Since the large, proud bird is not at all afraid of humans and builds nests on the roofs of houses or on the tops of nearby trees, returning annually to its old, habitable place, people are accustomed to viewing it as a guardian angel of the hearth, as a peaceful symbol of constancy and well-being.
The storks in the photo below are made from disposable cardboard plates and disposable plastic spoons. The birds' feet are made from small coffee spoons. To make this DIY spring craft you will need a glue gun.
A swallow made of paper. How to make a swallow out of paper

The grass is turning green
The sun is shining;
Swallow with spring
It flies towards us in the canopy.
(Alexey Pleshcheev)
The swallow is probably second only to the white stork in popularity. The attitude of the people towards her is especially warm and kind. And of course, she is a symbol of spring, the return of the sun. The Hermitage houses a Greek vessel - a pelica with a wonderful design: an adult man, a young man and a boy joyfully greet the swallow that has returned with spring.
Note: the swallow's eyes are glued on purchased ones (so-called "doll eyes"). You can buy such eyes, for example, in the online store Read.ru. See link >>>>
5. Crafts on the theme of spring. Bird crafts
From an ordinary paper plate you can make an original craft on a spring theme - a bird in a nest. It is appropriate to use decorative feathers for decoration.

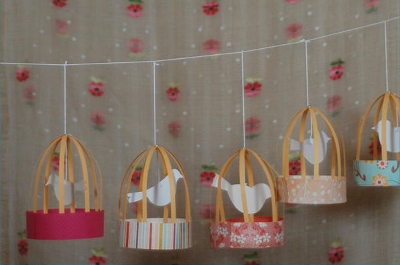
Of course, it’s not good to keep live birds in a cage; it’s better to let them fly free. We will make a spring craft, a bird in a cage, from paper and a plastic lid. For a detailed master class, see the link.
Look at what cute birdhouses you can make together with the residents from the so-called. waste material. This spring craft would be appropriate to decorate a wall in a child’s room. The birdhouses themselves are made from cardboard milk or juice cartons. The outside was painted with acrylic paints. The birds were made from plastic containers from Kinder surprises.

These bright spring birds on wires can be easily and simply drawn using fingerprints.


This spring bird applique is made using paper cupcake liners. Even a small child can make such a spring craft. The molds need to be folded (or cut) in half, glued to paper, and then finished drawing the birds’ legs, beaks and eyes.

6. How to make a bird from fabric. How to sew a bird from fabric
Birds can be made not only from paper, but also from fabric. Felt is best suited for these purposes. You can decorate a bouquet of spring twigs with ready-made fabric birds.
For preschoolers, in addition, this is also an excellent way to develop fine motor skills and speech. Let your child work with plasticine more, even if it leads to a little chaos in the house - such a pastime is extremely useful for the development of the baby.
Prepare a simple pine cone, a modeling mat, a few pieces of bright plasticine and a glass stack. Make a head ball (you will need bright yellow plasticine), as well as orange wings and a stand, a red beak and blue eye balls. Secure all the prepared pieces onto the pine cone, and then place the pine cone itself on a plasticine stand. So the wonderful bird is ready - an excellent “tinkerer” for 3-year-old children!
Plastic bottle
You will need to prepare for work a large bottle made of white dense plastic with a handle, scissors, and a marker. First, wash the container thoroughly so that no traces of its contents remain. Be sure to remove all labels. Draw lines on the plastic surface with a marker - measure a couple of centimeters from the bottom to remove the bottom. Next, on the side opposite the handle, draw a line along the seam. Draw an arch near the neckline.
Please note that when cutting out a bottle, you should place it on a stable surface, such as a table or floor. Cut off the bottom first and then follow the seam line. To cut out the beak, you should move from the cut seam to the neck along a curve. Stop when you reach the thread line.
To make a beak, the cut piece should be turned into the neck of the bottle. Step back 2 cm from the handle and cut two arches on the sides for the wings.
Place the workpiece with the handle down. Hold it and gradually turn the side inside, now you just need to work a little to shape it and the wonderful bird is ready!
Thread craft
This craft is also quite simple and can be done together with a three-year-old child. First, cut out a cardboard rectangle with sides 20 and 14 cm. Wind about 60 turns of black yarn around it along the long side, it should be voluminous and dense. Cut in half and set the threads aside.
Now wind about 40 turns of red yarn along the short side of the rectangle, and do the same with the gray yarn.
Now start shaping the body of the bullfinch. Place the red piece across the black one and cross it. Just tie the gray threads in half.
Form a ball with a diameter of 5 cm from cotton wool or padding polyester and wrap it with gray threads. Lay black threads on top, which will play the role of the head and back of the bird, and form the sides from red threads. Secure everything from below with thread.
Release the threads and form a head, while not tightening it too tightly. The beak can be made from a seed, and beads can be used for the eyes. Your child will probably really enjoy doing this